
Tools for Installing Security Cameras
Feeling safe in our homes should be something we shouldn’t have to think about and be number one for ourselves and loved one. Good locks, a big dog, alarms, high fences, all of these things are important. The best part of home security is how technology is always advancing and now we can not only monitor but control our home security systems with our computers or our smart phones. This is great, in particular for those of you who are away for extended periods of time.

If you are installing security cameras in and around your home, office or cottage, you can pay to have it installed or you can do it yourself. Here we will look at how to install the system and what tools you will need.
Why These Tools?
Well, you could try to use what you have on hand, but it’s important to install the equipment properly. It’s vital you have all the correct connections, cords, cables and other accessories to ensure it’s not only installed properly but will function to it’s top ability.
BNC
A BNC, or a Bayonet Neill-Concelman connector or cable is very small connect and disconnect radio frequency connector. You will use with a small coaxial cables as they carry the signal you need for radio, television and video, as well as other electronic devices that carry frequency. There are different types and brand names but as long as you have the correct corresponding size for male to female ends, you should be fine. Always check they are compatible before purchase.

Cat5, Cat6 Cables
These are exactly like what they sound like, category 5 or category 6 cables. These cables are what you used see on computes before they went wireless and they are used to carry data and information. Remember the ethernet cords you had hanging off your modem? Yes, those. There isn’t much difference between the cables and it’s a good thing to know that they are compatible with each other. Both cables are very reliable and the standard when it comes to home security. The cat5 likely has more than enough bandwidth to deal with your system.

CAT-5 Wiring Diagram & Crossover Cable Diagram
BALUNS
A Balun is a small device that looks like a small adapter, which is kind of is that works as a balance. It actually gets its name from its job. Balance to unbalance. It acts as a balance for two signals that may otherwise not work together. The are typically used for television antennas and simple connect two lines to provide a balance when they meet the output. A video Balan may also be referred to as a UTP balun and these connect and balance the cat5 and cat6 cables. There are different sizes and frequencies, so be sure to find the once suitable for your camera system.

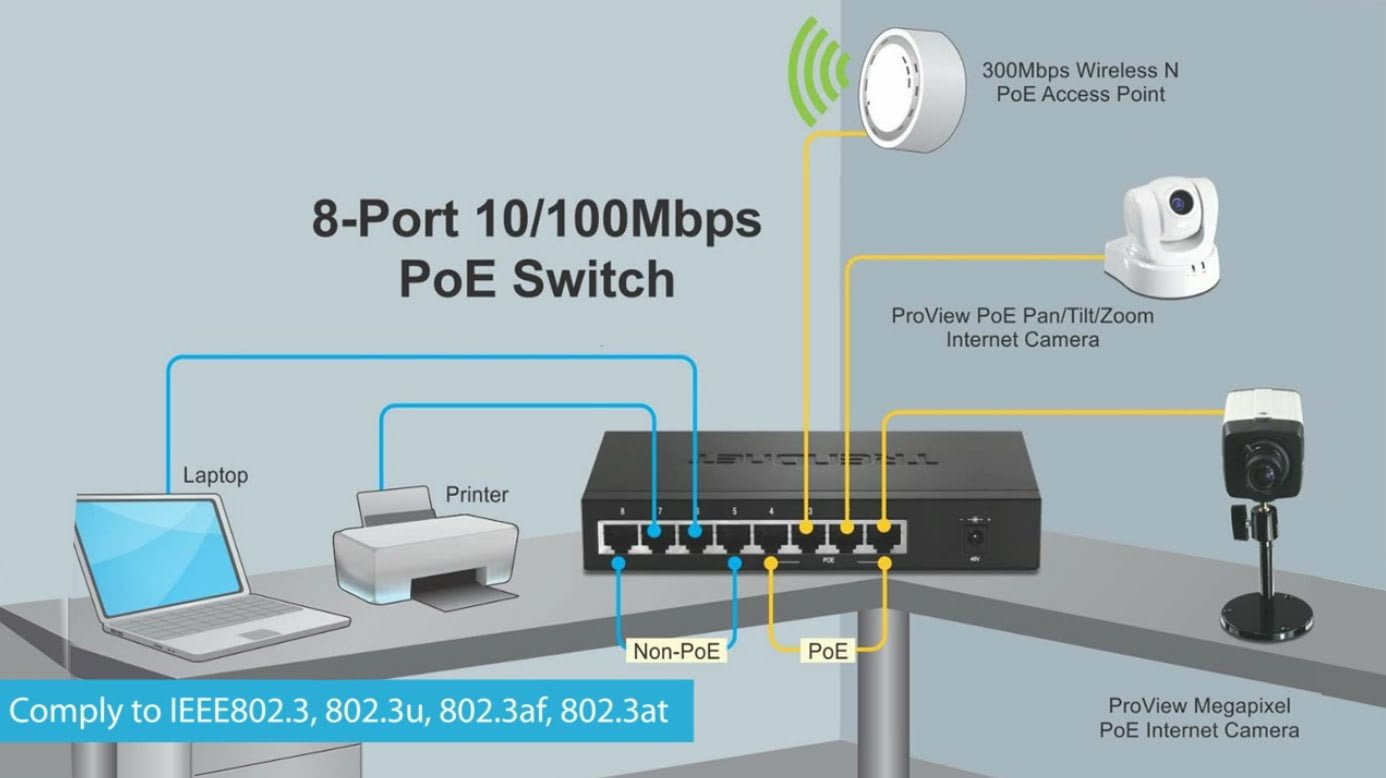
POE Switch
POE simply means Power Over Ethernet. This is a technology that allows network cables carry electricity. Your security camera usually needs two connections when it’s installed, A network connection which allows it to ‘talk’ to video recording and play back equipment and the power connection, to deliver the juice to make the camera work. If you have a POE switch enabled, you only need the network connection because it will receive electricity from the same cable.
There are a few advantages to using this POE switch. Cost is always one we like, but it saves time as well. You can install this yourself and the switch can be purchased anywhere normal hardware items are sold. It frees up the devices can be moved about and placed wherever they are most needed.
It controls and protects your network equipment from overloading, underpowering or being installed incorrectly. It’s reliable and be backed up, reset or easily disabled. It’s also easy to install or upgrade to an existing system you may already have. They come in a multiple of styles, from low-cost with a few ports to rather complex models with many more ports.

Powerline Adapter
This is a small device that allows you to extend your Ethernet network to another room using your AC wall outlets and electricity. These are plugged into the wall outlet and are attached at each end. The alternative is running cables or having in-wall cables installed. Plug one adapter into the wall in the room where you need it and the other in the wall socket next to or near your router. This allows the signal to carry to the next room.
It’s best to plug directly into the wall socket as plugging into an extension cord may not work, depending on the power surge protectors. The best ones for viewing video are AV powerline adapters and make sure they are rated faster than 300Mb/s. Some powerline adapters have multiple ethernet ports so you can use more devices, Smart TV, DVR, game console or whatever you want.
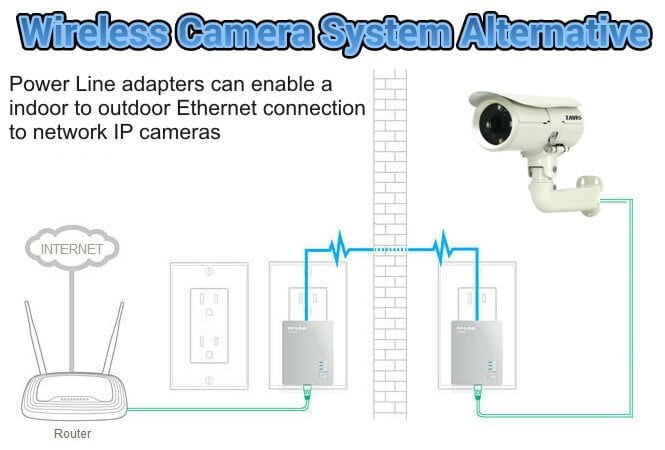
CCTV Camera Pros has been testing the use of power line Ethernet adapters as an alternative solution to wireless IP camera systems. For those that have never head of them before, power-line adapters allow standard electrical power outlets and cable to be used to connect devices to a network. The diagram in the picture below illustrates the setup.
“In many cases we have found power line adapters to be more reliable than WIFI when connecting IP cameras to a network and they are certainly easier to setup. When it comes to indoor to outdoor communication, it is a no-brainer to use powerline Ethernet because most of the time that is not even possible to transmit a WIFI signal from indoors to outdoors.”, says Mike Haldas, CCTV Camera Pros co-founder.
As most people know, wireless can suffer from interference and connection drops. There is also the more technical setup process that comes with setting up a wireless bridge between an IP camera and access point.

Power line adapters provide a true plug and play setup experience. The installer simply connects one adapter to a power outlet, then runs a CAT5 cable from the adapter to a network router.
Then the installer connects the seconds adapter (two are included in a kit) to an IP camera and a power outlet near where the camera is located. That is all!
Another benefit of power link adapters is they are very inexpensive. CCTV Camera Pros has standard and gigabit Ethernet kits starting at $59.99. Each kit includes two adapters.
This is pretty much what it sounds like. Your cables, wires, all the hardware needs to be somewhere secure, needs to be weatherproof, needs to be maintained. You want all these cables and wires to be away from the elements, bad weather, childproof, and safe from other damage, such as mice, mold or heat. Maintenance also means knowing what they are. If something goes wrong you need to be able to get in and troubleshoot without the hassle of not knowing what is what. It’s a great idea to label the cords, cables, wires and any other accessories you have there, such as adaptors or connectors. Color-coding will work fine, too. Don’t trust yourself to remember. If you color-code them, make a chart to attach to the door to remind you of what cord connects to what cable and what they do. This is particularly important if it’s not actually you or the person who installed it that has to do the fixing part. It’s better to organize that all and be ahead of the game.

Home security need not be complicated. You can ask for information anywhere these tools for security camera installation are sold. You can also find step by step directions on the internet.
Comments
Post a Comment