
Damp is simply an excess of moisture that can’t escape. Dealing with it requires a methodical approach to solving both the obvious and hidden causes
All houses, whatever their age, contain moisture. It will be present in the building materials used and the air within the home. The natural tendency of moisture is to spread out from wet to dry areas, and also to move downwards under the influence of gravity, and your house construction should allow for this.
Simply put, dampness is just a localised excess of naturally occurring moisture. The excess is always caused by one of two things: either a sudden increase in the amount of moisture entering the building, or a gradual local build-up of moisture caused by its inability to escape.
Dampness caused by a local build-up of moisture is often given a variety of names depending on where it shows up, such as ‘penetrating damp’ and ‘rising damp’. These names are both misleading and largely meaningless — the problem is almost always an excess of trapped moisture.
Old Homes
Unlike modern buildings, the construction of an older house is designed to prevent damp problems by preventing the excess build-up of moisture.
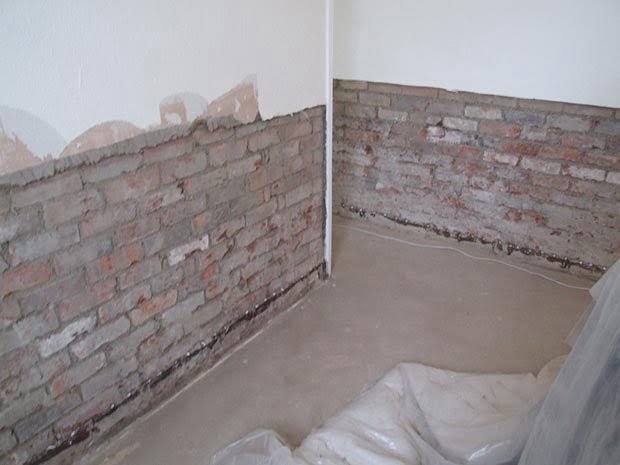
They were built almost entirely of permeable materials, with virtually no attempt at waterproofing in the modern sense, and so moisture will pass freely through the walls, floors and ceilings. Instead of being sealed into rooms as condensation, moisture inside the house is able to pass from room to room, and also pass through the external walls to the outside air.
Historically, most dampness was caused by the lack of maintenance leading to leaks. Nowadays, the majority of cases of damp in period houses are caused by inappropriate building work that stops moisture escaping.
Obvious Causes of Damp
Dampness which is caused by any sudden increase in the amount of moisture entering the building usually appears without warning — and in a matter of hours. It can also disappear just as quickly in the early days.
The dampness associated with this type of problem is usually very well defined, as it is concentrated and intense. The cause of the problem is often fairly obvious too.
PlumbingAny tiny drips from plumbing can be the cause of a large and intense damp patch — the escape of water may be small, but is often regular and concentrated on the same spot. This focused, repeated wetting quickly introduces more moisture than can escape, and the overload then spills into neighbouring areas.
Check for:
- corroded water pipes concealed in the walls
- new plumbing for central heating, kitchens and bathrooms which drips when first used
- failing waste pipes in older bathrooms
- damaged seals around baths and showers
Leaking GuttersWhen gutters at the eaves leak, water will either run directly down the outside of the wall for a short distance, or will splatter on the ground and window cills below. Leaks in other gutters often feed water directly into the roof space, and these can be extremely difficult to find.
Check for:
- splattering from gutters splashing water onto walls
- tracks of water in the roof which may be following roof timbers for several feet
Holes in RoofsThis normally means missing or slipped tiles or slates, but could also mean a worn out thatch, or a broken tile or slate.
Undersized GuttersChanges in the climate or the roof area since your house was first built may mean that the gutters are too small to cope with current rainfall. The only cure is to replace them for larger-capacity versions or increase the number of downpipes.
Check for:
- water spilling over the edges of the gutters on a regular basis
Grooves Under Window CillsThe majority of buildings from the mid-17th century onwards rely on windows with outside cills that project beyond the face of the wall. The underside of the window cill incorporates a groove that sheds surplus rainwater clear of the wall. If the groove is blocked, all of the rainwater running down the outside of the window will be directed straight into the wall immediately below the window.
Check for:
- grooves blocked with paint which cause large volumes of water to track down the wall
DownpipesOld cast-iron downpipes can easily rust through at the back without anyone being aware. Also, downpipes that disappear straight into the ground at the bottom, or that contain any sharp bends, are very prone to blockage from debris washed in from the gutters.
Check for:
- holes in the back of a downpipe
- water spewing back up out of down pipe joints
- water tracking from the downpipe along brackets and to the face of the wall
Less Obvious Causes of Damp
The cause of the damp is not always obvious, and there may be multiple defects that are all contributing to the cause. Although modern building work is often the primary cause of damp problems, there can be a delay of years before the dampness becomes noticeable, so the link isn’t always obvious.
Injected Damp-Proof CourseDesigned for use in dry walls, this type of treatment is incapable of working when installed in a wall that is already damp. They use either waxy creams that just form individual ‘fingers’ when injected, or chemicals dissolved in a water-based solvent. The solvents must completely evaporate away after injection to allow the chemicals to cure and form a water-repellent coating.
If a wall is damp, the solvents never completely dry out and the chemicals never cure; the process will just saturate the wall with even more water.
The walls may be replastered with a waterproof cement plaster to try and hide any damp for the duration of the guarantee. This stops the natural movement of moisture — making any damp problems worse.
Cement RenderingUsed on the exterior of walls, this sort of coating develops cracks all over its surface. The size of the cracks depends on the quality of the render and skill of the builder, but they’re impossible to prevent. The cracks encourage water into the wall, but the water cannot escape because the render is impermeable.
Even if cement render is not yet visibly cracked, it encourages condensation to form as moisture from inside the house can no longer escape — this process can even result in clay lump walls collapsing.
Replacement of Solid FloorsIt is important that any excess moisture from below the floors can pass up through the floor and harmlessly into the air. If a floor is replaced with a modern solid design that prevents this from happening, moisture is forced to travel under the floor into the adjoining walls to escape. This will increase the overall amount of moisture in the base of the walls and potentially make those walls damp.
If the outside ground levels are correct and nothing on the outside of the walls prevents the moisture from escaping into the air, you may find only the internal walls are badly affected by the modern floor.
Modern PlasterThis too is relatively impermeable and so prevents moisture passing through. It may just form a thin layer over the original plaster, but in the worst cases, all of the original plaster will have been removed and replaced with waterproof cement render covered with a thin layer of pink plaster.
Modern Paint or WallpaperUsed directly on solid walls (inside or outside in the case of paint), these too are mostly impermeable and prevent moisture moving through the walls and escaping.
Cement-Based MortarCement mortars not only stop moisture moving freely through the wall and escaping into the air, but they also encourage water into the wall through cracks that always form in cement. These mortars also force natural salts to crystallise in brickwork, causing the bricks to break up.
Converted Cellar RoomsMost below-ground rooms were cellars and cold stores which were an important part of the moisture control system. True cellar stores have their walls in contact with the ground and allow moisture to saturate them — ensuring they remain cool.
They are often built to intercept underground watercourses, and may have regularly flooded to a few inches. As nothing was stored on the floor or in direct contact with the walls, water and damp did not matter, and the flood water was used to save going outside to a frozen well or pump in winter.
Good ventilation allowed excess moisture to escape. If the cellars ever get converted into habitable rooms, the ventilation is stopped up — forcing moisture up into the rooms above.
High Ground Levels OutsideThis is almost guaranteed to be a problem. As a general rule, houses were always raised up above their surroundings. If the house was built with a brick paved ground floor, at the very least, this was laid on top of the existing ground level with a layer of fine ash or sand beneath to give a level finish.
Nowadays, you can often see old steps that once led up to doors, partially buried beneath later pavings. It is also common to see door thresholds that were originally above a top step, now below the adjoining ground so you step down to them.
Comments
Post a Comment